
Front Entry – BEFORE
A cluttered entry way is not the first impression you want to make on potential buyers.

Front Entry – AFTER
Removing the area rug and dog bed, along with de-cluttering the entry way, go a long way toward making this space feel more open and spacious. We changed out the busy black & white curtain panels for a neutral cream-colored sheer, allowing more light into the room while making the window seem bigger. Neatly arranged pillows help create a calm, soothing environment. Finishing touches like silk greenery and flowers, a small wall mirror and a tray on the ottoman make the space more inviting, while pops of yellow add some cheerful color.

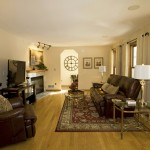
Living Room – BEFORE
There’s a lot going on in this small space between the rug, wall design, window panels and artwork. All those patterns tend to make the room feel busy, and busy translates to clutter which tends to make a space feel small.

Living Room – AFTER
Removing the rug, as shown in the previous entry picture, not only makes the room feel larger, but it reveals the hardwood floors – a key selling feature for this home. From this view, you get a better idea of how the neutral window panels brighten the space. Two large art prints on the patterned wall help tone down the busy-ness of the bold geographic design. The artwork above the TV was replace with a smaller, simpler piece above the TV, and some accessories below it add visual appeal. Toward the back of the room, we removed the tool chest that clearly doesn’t belong, as well as the shelf unit that made the space feel cramped. The new dining set we brought in works better with the rest of the furnishings in the room, giving it an overall more updated feel.

Dining Room – BEFORE

Dining Room – AFTER
A close-up view of the before & after dining room space.

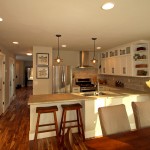
Kitchen – BEFORE

Kitchen – AFTER
Galley kitchens can make a home harder to sell, mainly because they tend to feel cramped. We made this kitchen feel as large as possible by a) de-cluttering; and b) painting the bright yellow wall the same gray as the opposite wall. A modern glass-tile back splash updates the space and adds considerable appeal. Some unusual wall art was replaced with something more suited to the space and to a broad range of buyers.

Kitchen, view 2 – BEFORE

Kitchen, view 2 – AFTER
While taken from slightly different angles, you can see what a difference these simple changes have made. Too much clutter on shelves and counter tops gives the impression there isn’t enough cabinet space, so it’s important to put away all but a few essentials. A basket or bin on a shelf can provide storage that is visually appealing. Notice the pops of yellow that carry through from the living and dining room spaces, creating a sense of flow.

Bathroom – BEFORE

Bathroom – AFTER
About the only thing you notice in this “before” bathroom picture is the wild shower curtain. We create a much more appealing space by replacing it with a white one and pulling it open to reveal the window and glass tile wall. Suddenly, we’ve added a whole new dimension to this tiny bathroom. Removing the rug also helps make the space feel larger. Fresh towels and wall art complete the look of an attractive, functional space.

Master Bedroom – BEFORE

Master Bedroom – AFTER
Positioning the bed opposite the entry point tends to make a small bedroom feel larger. We moved the dresser to the opposite wall and added a large mirror, adding functionality and light to the space. A small table was brought in to provide a proper nightstand and place for a bedside lamp. Wall art, extra pillows and a coordinating throw help convert this into an inviting and comfortable master bedroom.

Office – BEFORE

Office – AFTER
This is a great office set-up for two that just needs to be seen! Removing the obstacles at the entry was the first step. We hung a contemporary piece of art at the entry and moved the printer from under the desk to the red shelf. The wall stickers were removed and a curtain panel added (notice the larger window!). Shelves and desk tops were straightened, and a touch of greenery adds warmth. Your eye is drawn into the room in the “after” photo, whereas before, you were stopped short.

Nursery – BEFORE

Nursery – AFTER
A little organization goes a long way in this child’s nursery.

Family Room – BEFORE

Family Room – AFTER
A long, narrow family room is a challenging area to stage, but we start by removing the ottomans to open up the walkway. The chairs at each end of the couch just elongate the space, so we removed one chair and added a silk tree to soften the edge. Opening a French door calls attention to that feature and softens the opposite corner. Moving the blanket from its horizontal position in the center of the couch to a vertical position on the far chair larger pillows more in proportion to the couch are subtle changes that help the space feel wider. The orange wall art was replaced with art that simplifies the color scheme. The dark window panels are replaced with a light-colored valance that better fits the window. The result is a much more inviting family room space!
Doing all of these renovations also gave us the opportunity to check over our home warranty plan, which we have with a company similar to First American (https://homewarranty.firstam.com/homeowner/home-warranty/pennsylvania). This has been really helpful over the years for when things like our dishwasher malfunctioned and we had to get it fixed on short notice. It has saved us a lot of money, so reviewing and putting more things into our plan should be a lifesaver in the future.